


Ever since moving into my apartment in May, I have envisioned a pair of small dressers flanking my fireplace. This is one of my favourite looks and it also provides some much needed storage for my board games, dvds, cozy blankets for watching tv, etc. My dream was to find a matching vintage pair, but this proved to be a challenge. Vintage pairs of anything are hard to find, and because of their rarity are usually pretty expensive when you do finally find anything. I decided that for now, the best plan would be to try my hand at an ikea hack.
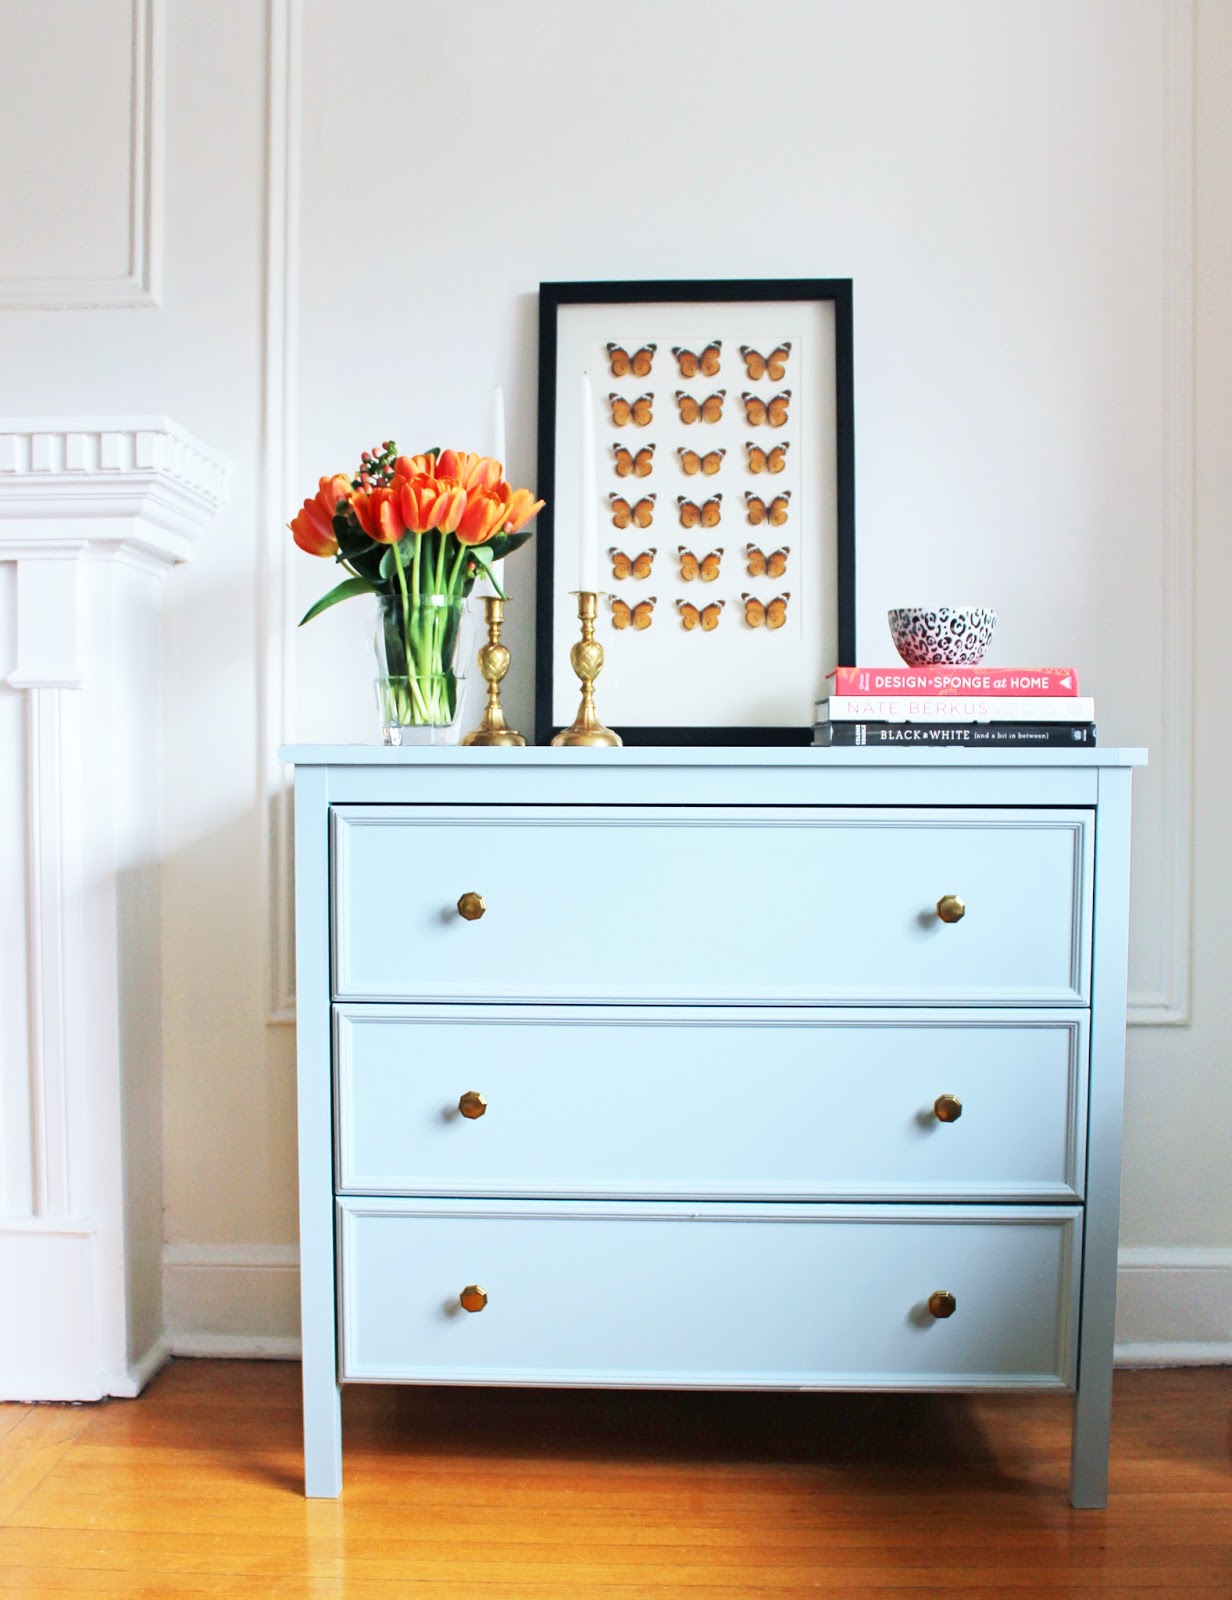
I bought the KOPPANG 3 drawer chest. I liked the simple lines as a nice blank canvas and the price was right.

I did the rest of the steps after assembling the dresser, but if I were to do it again I would add the trim and paint everything before putting it together to make the job easier.
Next I bought some small decorative trim from the Home Depot and used a saw and mitre box to cut it. I glued the trim pieces onto the drawer faces using No More Nails glue and filled in any gaps in the mitred corners with paintable caulking. The trim really helps to make this streamlined piece look more traditional.

Next came priming and paint. I used the Zinnser Shellac Based primer (which Jenny of Little Green Notebook swears by for painting IKEA furniture). I painted out the dressers in a beautiful robin's egg blue called Cape Hope by Beauti-Tone paints.
 Lastly, I switched out the cheapy-cheap black plastic knobs that came with the
dresser for some pretty brass octagonal knobs that I got a liquidation
shop in my home town for only $2 a piece and voila!
Lastly, I switched out the cheapy-cheap black plastic knobs that came with the
dresser for some pretty brass octagonal knobs that I got a liquidation
shop in my home town for only $2 a piece and voila!I think that the dressers now have that vintage/traditional look that I was hunting for. It's also my first time owning any painted furniture, and I have to say, I'm loving the dose of colour!!


The place is really coming together! In the living room all that's left to do is a buy few accessories, get my cane chairs reupholstered, sew a couple of small lumbar pillows and paint something big for over the sofa. In an ideal world I would also ditch that ceiling fan. Have you ever done an ikea hack? Share the link in the comments and I will be sure to check it out!
xox

19 comments:
Hi Tiffany, I LOVE a good IKEA hack! And thanks for posting what primer to use, I've often wanted to paint IKEA furniture but their finish has always stopped me because I was not sure how the paint would hold up. I did this IKEA hack https://instagram.com/p/3HYhKoh4P2/ and am still happy with it 5 years later. Can't wait to tackle some more!
Amy.
Tiffany,
What a gorgeous space! I am loving how its all coming together, you have such a fabulous eye for gorgeous! I did an Ikea hack using FAT paint (chalk paint created by a good friend) Here is mine: http://www.markovadesign.com/2014/12/ikea-hack-using-fat-paint.html
Can't wait to see your bookshelves all styled up!
I love this! Going to Ikea this weekend to add it to my room!
http://www.bysophialee.com/
You have a lot of collecting beautiful interior photos. It seems you are the one who has a great work of art photography.
I seriously need to get my wood craft on! I have been wanting to make a headboard for our bed!! You did a great job!!
Marlene
Seattle Water Main Break Company
I love this Tiffany! Sometimes just eh slightest changes make such a difference. This went form IKEA to antique!
That's a real transformation! You can't even tell that it used to come from IKEA, and I'm a removalist in Sydney and I can't tell!
I have seen your entire pictures regarding interior design and home improvement and i love them so much you have post so beautiful picture with valuable information which is i really like it home renovation dubai
Thank you..
I visited your blog for the first time and just been your fan. I Will be back often to check up on new stuff you post!
室內設計
I visited your blog for the first time and just been your fan. I Will be back often to check up on new stuff you post!
Interior Design
It is so crazy to me how much more expensive that dresser looks with just a bit of moulding. Fabulous job. The colour is rather incredible as well. Well done!
The tiffany cabinet looks pretty cool! I really like it.
室內裝修設計
Premium work on furniture, this is the creativity of Sir!
I appreciate you.
Chest of Drawers Premium
These home interior designing ideas looks amazing i idea of wooden drawer with white paint its really cool i like it very much I have also some couple of home decoration furniture's on Interior Design Dubai and they are offering these designing services with free installation.
The Home Depot link to the trim no longer works. Can you tell me which trim you used? Thanks!
A good shower enclosure will come with installation instructions, and you can easily install one yourself if you follow the directions. A good quality shower enclosure will have a warranty against breakage or damage to your shower stall or walls. Here are just some examples: Offset Quadrant Shower Enclosure
Post a Comment