PhotobucketPhotobucketPhotobucketPhotobucketPhotobucketPhotobucket
Showing posts with label interiors. Show all posts

2.15.2016

Cane Chair Makeover - Switch Studio


I was browsing craigslist one afternoon when I saw a listing for a pair of vintage cane chairs on sale at the local (okay, not local, I had to drive about 45 minutes) ReStore. Now, let me tell you, a pair of anything vintage is hard to come by, and when you do find a pair, it usually means $$$. But these were reasonably priced at $50 each, no tax. I knew that I had to have them. 

After folding down the seats in my parents' van and making the drive to the location, I was a bit disappointed to see that the upholstery was in very bad shape. The cream striae velvet was very yellowed and very dark and stained in places, and some spots looked like they had been scratched by a cat, leaving rips and tears in the fabric. Still, they were the perfect thing for the apartment I was on the verge of renting, and I knew with a little love they could be really special. See the before below:
Fast forward 11 months into living at the new apartment and the chairs were still sitting here unchanged. Finally, I enlisted the help of reupholster extraordinaire Staci Edwards of Switch Studio. I left the fabric, chairs and plan in Staci's capable hands and on Saturday, I went to pick them up!! I was so nervous to see them but I am thrilled with how they turned out!
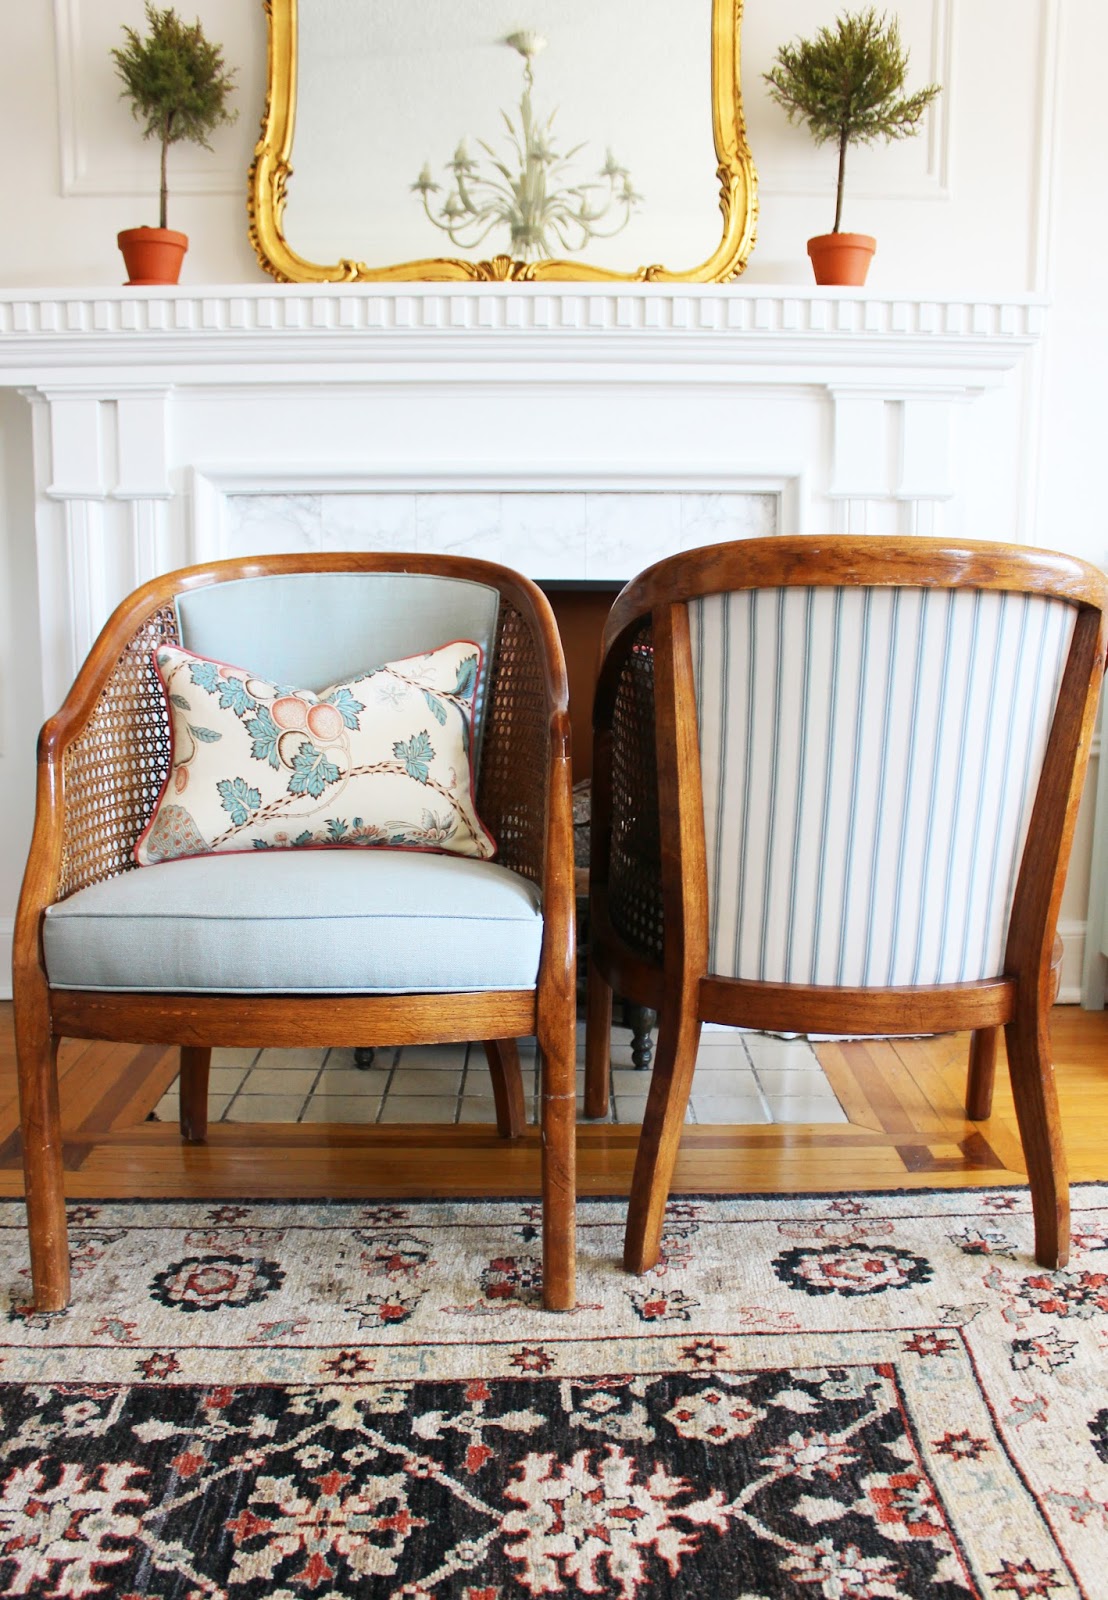


I went with a simple 100% linen in soft blue from Designer Fabrics for the front body of the chair. While I initially thought about doing a striped pipe as well, I think it would have been too busy with the texture of the cane. The stripe on the back panel, however, is the perfect touch. It adds pattern and interest but is not trendy. It is classic and timeless. 

Switch Studio also did up the sweet little lumbar pillows. The Schumacher fabric used was the first 'ah-ha' moment I had when developing the scheme for this room. It really made the corals and aquas in my existing (and beloved) rug make sense, and I used this fabric to pick out the fabric for my sofa cushions. I love the contrasting coral pipe on these pillows. It compliments my coral velvet pillows from Stuck on Hue so nicely. 


 I chose to keep the wooden and cane frames of the chairs in their original condition. They are a little roughed up, but I love the sense of patina and history that they contribute. I like my vintage in vintage condition.

 The peak-a-boo striped back is so charming.


Truthfully, I thought about attempting a DIY reupholstery job on these chairs to save money, but I knew that I wanted to keep these chairs for many years to come and didn't want to mess them up. I wanted them to look perfect, not just 'good enough considering I did it myself'.  

Switch Studio did an amazing job on the chairs and pillows and I couldn't be more thrilled! Well worth the investment. They are located in Oakville and service Oakville, Burlington, Mississauga, Milton, and Greater Toronto Area. If you are looking for an excellent, fairly priced option for reupholstery, this is your spot! A big thank you to Staci Edwards for making my chair dreams come true!
Photobucket

2.13.2016

Project Northlake: Kitchen Reno - Progress Pictures

So much has been happening in my childhood kitchen since the last time that I posted! Although by no means a glamorous post, I thought it might be fun to show you some of the behind the scenes moments and fill you in on a bit of the realities of the reno. My family has been doing most of the work on the kitchen so far. The progress has been quick, but not without its share of setbacks.

We needed to find a new tiler, the hardwood installation got delayed, a hole got punched through the wall into the dining room during demo, we painted the entire first coat of paint before realizing that the colour was mistinted and drying far too bright, our area rug was cut to the wrong size by the binders. What I've come to learn in this industry is that projects rarely, if ever, run perfectly smoothly. When embarking on a renovation, you need to be prepared for things to go wrong, but sometimes managing expectations is easier said than done. Luckily, we are back on track and the finish line is in sight!

We started by tearing out the dated railing that separated the kitchen from the sunken family room. This is really going to help to open up and modernize the space.


My parents ripped up the linoleum floors and carpet and my older brothers pitched in with the demolition of the kitchen. I was especially excited to see the bulkhead go. The new cabinets will reach to the ceiling, making the room feel much bigger and taller, as well as adding extra storage.


My dad took care of the new insulation and moving some outlets. While he had originally planned to do the drywalling himself, we thought it best to bring in a professional to patch the walls seamlessly.


The last time I was home, the painting had started. We are really lightening up the space with a soft, muddy blue/green colour rather than the coffee colour seen in the 'befores'


It's hard to believe that when I'm in Waterloo next weekend we will have our hardwood floors and new cabinets installed! Then it will be a couple of weeks for the new quartz counter tops to be made and installed. I can't wait to show you the big reveal!
Photobucket

4.14.2015

Fireplace Facelift: A Rental Friendly 'Marble' Makeover


One of the things that I knew I wanted to change in my rental was the yellow tile surrounding my fireplace. I'll admit that once I moved in, the yellow tiles grew on me. They were more charming than I originally guessed, but I still felt that they weren't in keeping with my overall style and vision for the space. A couple of them were also cracked. (And yes, the ceiling fan is another thing I'd like to change!)


The tricky thing is that this is a rental unit, so I have to be realistic about what I can change and what I have to live with. I want to retile my kitchen backsplash eventually, so I'm saving the 'ask the landlord' question for that. Furthermore, I wanted marble and I know that it's not in the budget, and investing a lot of money into a rental doesn't make sense for me.

What I really needed was a rental friendly, non-permanent, easy, no-hassle, and inexpensive solution.
And that's when it donned on me, what about something I can peel and stick? So that's exactly what I did! I ordered up this amazing contact paper from my friends over at Design Your Wall, and went to work. A quick note about this contact paper. It is SO thick and durable, some of the tiles I had to unpeel and restick over ten times to get it just right, and the paper didn't rip, crinkle, or lose its stick. It really feels almost more like vinyl than paper. It is even wipeable! The pattern is also extremely realistic. 


The contact paper comes with a great grid on the back, so it makes it really easy to cut straight lines.

Next, just peel and stick! (and swear and get frustrated and almost give up). I'll be honest, I found this part difficult because part of my tiles are in behind the copper insert, so to peel and stick while getting it in behind there was very tricky. Thank goodness I could peel up and restick so many times!
I used the small triangle to help smooth out any air bubbles as I went. You should also make sure that your tiles are clean and dry before sticking.


I used the utility knife to reveal grout the small grout lines if the paper was covering it.


And voila! I can't believe how great this project turned out. I still need to add some caulking around the perimeter just to hide some of the pre-existing gaps, but I am loving the transformation! This really was the perfect solution! I don't think you can tell that it is paper at all unless you get really close. A big thank you to Design Your Wall for such an amazing product!

Now I'm thinking about what else I can marble-ize!
xox
Photobucket

3.02.2015

Gilt-y Pleasure

Hi my loves! I'm so sorry for my extended blogging absences lately. I've been so swamped with school, working, completing an internship, and writing my thesis that it leaves very little time to blog. Now, add moving to that list!!

Yes, that's right, I'm leaving my current student housing sitch for a big girl one-bedroom apartment.
 I'm feeling a bit sad to leave this little studio apartment that has brought me so much inspiration and opportunities over the past 2.5  years. But it's time for me to move on to a place all my own, a lovely charm filled one bedroom apartment located downtown Toronto that I can't wait to show you all! This also means a blank slate for new decorating (aka lots of new blogging material!). Not to mention no one else's dirty dishes in the sink. I am so excited about this next chapter and to get back into the blogging swing of things over the next few months.

To celebrate, I just bought myself my first housewarming gift, a gorgeous vintage gilt framed mirror that I cannot wait to hang up in a very special spot (stay tuned!).
I especially love the shell details on my mirror. This is a motif made popular during the Rococo era.


I will be fully moved in by April 1st, but in the meantime, enjoy some gilt mirror goodness that is serving up some MAJOR inspiration for the new space!
Lauren Gold via Lonny Mag

Nate Berkus and Anne Coyle via Elle Decor

Sarah Richardson via HGTV

Jennifer Ferreira via House and Home
Gilt mirrors are my total gilt-y pleasure. That and Pretty Little Liars...
What's YOURS?
xox
Photobucket

2.22.2012

Strolling in Halifax

Yesterday was a beautiful winter day in Halifax, but today is back to fog and rain. I took advantage of the nice weather by taking a walk and admiring the beautiful housing and architecture which is characteristic of the Maritimes. Painted in bright colours, not a brick in sight, and cape cod styles with white pickets and columns, these houses are sure to remind you of the sea.
My favourite house was this black number with a bright pink door. Notice that neat little crescent window on the roof!:
Imagine being able to say "It's the one with the pink door" to visiting guests. This house totally my style! In fact, it matched the outfit I wore for my walk perfectly!:
 Here are some other houses I saw and liked, and a few ideas of how you can incorporate exterior ideas in your interior design plans!
What do you think of the housing style out East? Could you paint your house bright blue? What about a hot pink front door? I think I could settle in quite nicely here. SO charming.
xox
Tiffany Leigh

2.15.2012

Styling with Flowers

I always say that a room isn't complete until there is a vase of fresh flowers. Here are some of my absolute fave floral picks:
1) Peonies
via
via
2) Tulips

via Style at Home
via

via
3) Blues and Purples: Hydrangeas, Lilacs, and Delphiniums
Hydrangeas via
Lilacs via Samantha Pynn
Delphiniums via Style at Home
What is your favourite flower? Did you get a bouquet for Valentine's Day?
xox
Tiffany Leigh

2.09.2012

Prettiest Little Bedroom

via
Isn't this the prettiest little bedroom that you ever did see? So feminine and delicate. I love the incorporation of Pantone's colour of the year, Tangerine Tango, in such a temporary form, yet it still steals the show. The upholstery on the chair is perfect, the floral pillow on the setee compliments the desktop accessories so well, and don't even get me started on the tutu inspired chandelier! I could go on and on! Photography by Monic Richard for Style at Home Magazine.
Do you love it?
Tiffany Leigh

1.16.2012

Trend I'm Loving: Neon Pink

I recently came across this beautiful outfit via tumblr:
I just love her outfit, specifically the BLAZER (and the pup!)

Bright pink has been on trend in both the fashion and decorating worlds for awhile now, and I'm obsessed. Shocking Pink was always my favourite crayon in the box. The following spaces will explain why:

 ^^The otttoman, pillows, glass accessories, and ESPECIALLY that lit up lampshade, take a white room and amp up the personality factor!

^^This wallpaper is certainly not for the faint at heart. You can see in the backroom how the light really brings out the brightness of the print's colour. Does anybody know what wallpaper this is? I love it!

From the living space of Anne Ulku, a Minneapolis based freelance graphic designer via Design*Sponge
^^Art and accessories contribute the neon pink to this room. I love all the bright and fun details.


^^ A pink couch! My boyfriend would never allow it. But maybe if I get my own place I'll get something like this. It's so fun.

Get the look via IKEA 
KARLSTAD sofa, IKEA. $499.
KLUBBO coffee table, IKEA. $99. (came out a little blurry in the picture, but its quite streamline)
POANG rocking chair, IKEA. $179.
Add to this some colourful pillows, wall mount shelves chalked full of books, a small round side table, some accessories to the coffee table top and you've got this look for a reasonable price!

Do you have some bright pink in your wardrobe? What about pink decor?
-Tiffany Leigh